
The short answer
How to insulate a shipping container: confirm condensation or a leak, with leaks repaired first. Fit boards or panels on framing with a vapour control layer, or bond closed-cell spray foam to the steel to insulate and stop condensation. Depth is typically 25 mm or 50 mm closed-cell, depending on the roof make-up, confirmed before we spray. Keep vents clear.
At The Regis School in Bognor Regis, we treated the storage container with condensation and left the second one unsprayed because it had a live leak. The customer reported condensation stopped in the treated container. Read the container project.
Our shipping container insulation page covers the full service. To choose the depth, we need the shell and what you will use it for; the length alone won't decide it. Read Thickness and objective for how we work that out.
HOLVEM has completed more than a dozen container jobs this year.
01Why it rains inside
Why a container can rain on the inside
Here is why a container can drip in dry weather. Warm, moist air meets the steel ceiling; when the sheet is below that air's dew point, water forms underneath and falls onto the contents. Read why steel sweats for the same process on metal roofs.
A container changes conditions as it is used. Doors open, goods arrive and moisture can be introduced with the contents or activities inside. The roof and walls respond to outside conditions while the internal air follows the operation. The specification needs to understand both.
Insulation changes the thermal behaviour of the treated surfaces. Correctly diagnosed and specified, closed-cell spray foam stops roof condensation. Zero call-backs for condensation. The depth is typically 25 mm or 50 mm closed-cell, depending on the roof make-up, confirmed before we spray.
That also makes the vents important. The insulation treats the cold steel, while ventilation handles moisture from the use inside. Keep the required openings clear and include both jobs in the design.
Before comparing insulation, tell us what you see: water across the ceiling on cold mornings, wetting at one seam after rain, or both roof and walls affected. Send that pattern with the photographs so we can choose the first checks.
02Leaks first
Check for leaks before insulation
So check for leaks first. We inspect the shell and visible damage, with the water pattern you have described. Send photographs from safe positions and leave any hard-to-reach detail for the planned survey.
Existing leaks go to a roofer or container repairer first; HOLVEM is not a roofing contractor. Spray foam is not waterproofing.
The Regis School record makes that boundary concrete. One container received the agreed internal treatment and condensation was reported stopped. The other container leaked and was declined. The decision came from condition, rather than treating both as the same insulation job.
The decision came from condition, rather than treating both as the same insulation job.
We also look at rust, paint and old coatings before deciding how to prepare the steel. Your quote should explain that preparation and identify repairs needed before the insulation can bond.
Include previous repairs and mark where it gets wet. That helps us separate the shell repair from the insulation job and plan the inspection. Read Roof leak or condensation for what to note.
03Decide the use
Decide what the container will be used for
Once the shell is checked, start with its use. A school store, workshop and occupied site office need different heating, ventilation and finishes. Tell us which you are building.
For storage, describe the contents and loading routine. For people working inside, include the heating, ventilation, services and lining. If you are changing the use, agree that design before pricing the insulation.
Tell us whether the roof, walls and floor are all part of the work. A proposal should define the treated area and its exclusions. An outline measurement is useful for planning, but it should not be mistaken for the area finally priced or installed.
Clearances matter too. Internal fittings, racking, lighting and access to doors can affect the assembly and the work. A framing-and-board arrangement and bonded foam use space differently; compare the complete finished interior, including any protective lining that the design requires.
If the container has been modified, send drawings or photographs of the alterations. Windows, doors, partitions and service openings create junctions that need to be resolved. They also affect access for preparation and application.
04Methods compared
Insulation methods compared
Now compare the finished interiors. Boards, panels and sprayed foam each need their own joints, supports and finish. Ask how the complete fit-out works with your shell and the use you have planned.
| Method | Arrangement | Condensation and junctions | Space and finish | Time on site | Fire | Vents |
|---|---|---|---|---|---|---|
| Boards with framing | Insulation fitted on framing with a vapour control layer and specified lining | Seal edges, junctions and service penetrations through the designed layers | Framing and lining take additional internal space | Framing, cutting, fitting and lining are separate stages; programme agreed for the container | Check the manufacturer's tested complete assembly, including lining | Keep required openings clear and detail the lining around them |
| Preformed panels | Panels fitted to the container interior | Resolve joints, fixings, corners and perimeter details | Panel layout and finish define the completed interior | Fitting, sealing and finishing need their own agreed programme | Ask for tested assembly evidence and any required finish | Retain required ventilation and specify panel boundaries |
| Bonded closed-cell spray foam | Insulation bonded directly to suitable steel at the specified depth | Seals and insulates in one continuous layer to stop confirmed condensation | Follows the steel profile without an insulation-support frame | Regis's emptied and sheeted container was treated in a single visit; your programme is set at survey | Any fire claim belongs to the manufacturer's tested build-up, with the required coating or lining | Mask and leave required vents clear |
The difference is easiest to understand at a corner or opening. A large flat sample can show a material; the specification must show what happens when that material meets the container's actual shape.
With boards and panels, look at the joints and the space behind the lining. The design needs to show how warm, moist air is kept away from the cold steel and what any cavity is for. Ask for those details in the proposal.
With spray foam, we check the surface and set the depth before bonding the layer to the steel. That can avoid a separate insulation-support frame. A lining may still need supports, so we show the insulation and later fit-out as separate stages.
Then choose from the complete job. An occupied office can need different services and a different lining from a store, even when both use the same insulation method. Include those stages when you compare prices.
05Five stages
Five stages of a specified installation
The five stages, in order
- 01Condition and objectiveConfirm the cause of water and any prerequisite repairs; define what the project is for.
- 02Preparation and protectionAgree what the client removes, what the team protects and the surface expected for application.
- 03Vents, openings and interfacesLeave the required openings functional; identify services, fittings and junctions on a marked drawing.
- 04Apply the insulationThe approved method and depth, with the specified continuity and checks.
- 05Finish and handoverWho supplies any lining or coating, the continuing exclusions and the return to use.
1. Check the shell and agree what it needs to do
First, record the use, steel shell and water pattern. We confirm the cause and any repairs, then agree whether you want to stop condensation, improve thermal performance, change the use or combine those jobs.
The survey brings those decisions together. If you need a U-value, we calculate the whole construction; if the roof layers need a closer moisture check, we carry that out before agreeing the build-up.
You should then have a clear written proposal: which surfaces we treat, what needs fixing first and what result the treatment is designed for. You can see how the installation fits the rest of the container project.
2. Agree preparation and protection
Next, agree access to the steel. Tell us what you will remove and what our team needs to protect, including shelving and fixed equipment. An empty shell and a fitted container need different preparation and working plans.
Preparation is specified for the substrate, not assumed from its appearance. Existing finishes, rust and contamination need assessment, and any necessary preparation belongs in the quotation. The final proposal should describe the surface expected for application.
Protection needs the same clarity. Doors, fittings, electrical equipment and openings may be outside the treatment. They should be identified and protected through the agreed method, rather than discovered as exclusions once application begins.
3. Mark vents, openings and interfaces
Keep the ventilation plan in view while the fit-out is organised. Your designer identifies the openings needed for the use; our insulation stops at the agreed boundaries so those openings stay functional.
Services and fittings create further interfaces. Identify where cables, lights, sockets and other equipment need access. If future maintenance or alterations are likely, discuss them before the treatment is specified.
A drawing or marked photograph makes that easy to agree. Show the roof and wall areas, services left clear and junctions to finish, then name who supplies any later lining. You and the installer can work from the same plan.
4. Apply the specified insulation
The installation follows the approved method and depth for the container. For closed-cell treatment, the foam is applied to the assessed interior surfaces, with the specified continuity and checks.
For condensation, the depth is typically 25 mm or 50 mm closed-cell, depending on the roof make-up, confirmed before we spray. A thermal target or another construction detail may require a different calculated specification.
For a board or panel system, the corresponding stage includes its specified supports, joints and control layers. Comparing that complete work with foam application is more useful than comparing the names of the insulation materials.
5. Complete the finish and handover
Finally, include the coating or lining your interior needs. The quote should say who supplies it and what it does, alongside the insulation. That lets you budget for the finished space.
Handover should identify the work undertaken, any continuing exclusions and the arrangements for returning the container to use. Keep the operating and maintenance information with the specification, especially where services or future modifications are involved.
The sequence can be concise on a straightforward storage job and more involved on a fitted commercial unit. Its purpose is the same: make the intended finished result and the responsibilities clear before installation starts.
06Keep vents visible
Keep the ventilation decision visible
The fit-out leads us back to ventilation. Contents, people and processes create different moisture loads, so set the openings for the way you will use the container and keep them clear.
Leave the required vents and openings clear. If their condition or arrangement needs work, identify that separately. A treatment that obscures them is not a substitute for a designed ventilation system.
There is also a difference between intentional ventilation and unintended air paths behind an incomplete lining. The design needs to consider both rather than describing every gap as useful ventilation.
Ask who provides the ventilation and who installs the insulation. Put both responsibilities in the plan, so our work and your designer or fit-out contractor's work meet at the right details.
07Framing, floor and lining
Framing, floor and internal lining
If you choose a frame and lining, compare the space left once they are fitted. Supports, services and finish all take room, so include them with the insulation depth when checking usable dimensions.
Bonded foam follows the corrugated steel profile without an insulation-support frame where the assessed arrangement allows it. A required lining can add its own framing or supports, so the finished dimensions still need to be planned.
The floor is a separate part of the construction. Ask whether it is included, what is retained and how any proposed treatment affects access and use. Do not infer a floor specification from a roof and wall application.
For a site office or welfare conversion, coordinate the insulation with the other contractors before the interior is closed. Changing a service route after the lining is complete is a different job from planning it into the original assembly.
08How long it takes
How long will the work take?
For an idea of the programme, look at The Regis School. We emptied and sheeted one storage container, then encapsulated it inside with 25 mm closed-cell in a single visit. That preparation was part of the job.
Your own programme follows the repairs, contents, preparation, services and finish. We set it out in the quote, including what needs to be ready before the team arrives.
Ask when the container must be emptied or released, and what the handover arrangements are. If several units are involved, discuss their operating requirements individually rather than assuming all can be taken out of use together.
Planning works better when the treatment and finish are separate visible stages. A foam application can be one part of a larger conversion, with other work determining when the completed space is ready for use.
09What to compare
What to compare when buying
With the method and programme clear, compare the price. Our commercial cost guide gives the foam rates; your quote confirms the actual container area, preparation, depth and finish.
Check that both prices cover the same surfaces and finished interior. Roof-and-wall foam is different from a fully lined space. Include masking, access, services and the work you or another contractor will supply.
Ask why each proposed depth has been chosen. A layer to stop condensation and a layer to meet a thermal target can differ. Your quotation should explain the result and construction behind the number.
Then check what is priced separately: leaks, structural repairs, lining and ventilation changes. Include that work in the project budget so the finished container is ready for its planned use.
10Fire and the finish
Fire requirements and the finished interior
The finish also needs to meet the fire requirements for your use. Ask your project team what is required, then check the proposed insulation, coating or lining against the applicable tested build-up.
Where a fire-performance claim is made, it must refer to the manufacturer's tested build-up. It should identify the configuration to which the evidence applies.
Put any required coating or lining in the design and quote. Read Fire performance and coatings, and tell us whether the container will be occupied or used for storage. That is the information we need to check the finish.
11Different briefs
Different commercial containers, different briefs
School and equipment stores
For a store, describe what goes inside, how it is loaded and where drips have affected it. At The Regis School we treated the sound storage container; the second had a live leak, so we did not spray it.
For your school store, send the shell and use first. We then set the depth, preparation and programme for that container. The 25 mm layer and single visit at Regis show how one prepared store was treated.
Site offices and welfare units
For an occupied conversion, bring the heating, ventilation, services and lining into the design together. Agree that finished space before asking for the insulation price, so the foam fits the rest of the work.
Tell us about partitions and fixed fittings, and send drawings if available. They help define the treated area and responsibilities without assuming that a bare-container method suits a fitted interior.
Farm and business stores
Explain how goods arrive and whether the container is opened frequently. Contents and use can affect internal moisture conditions and the working programme. The roof and walls should be assessed for the objective that matters to the operation.
If the unit is already loaded, include that in the enquiry. Preparation and access should be agreed before booking, so the programme describes the actual working conditions.
12The Regis School
The Regis School, Bognor Regis
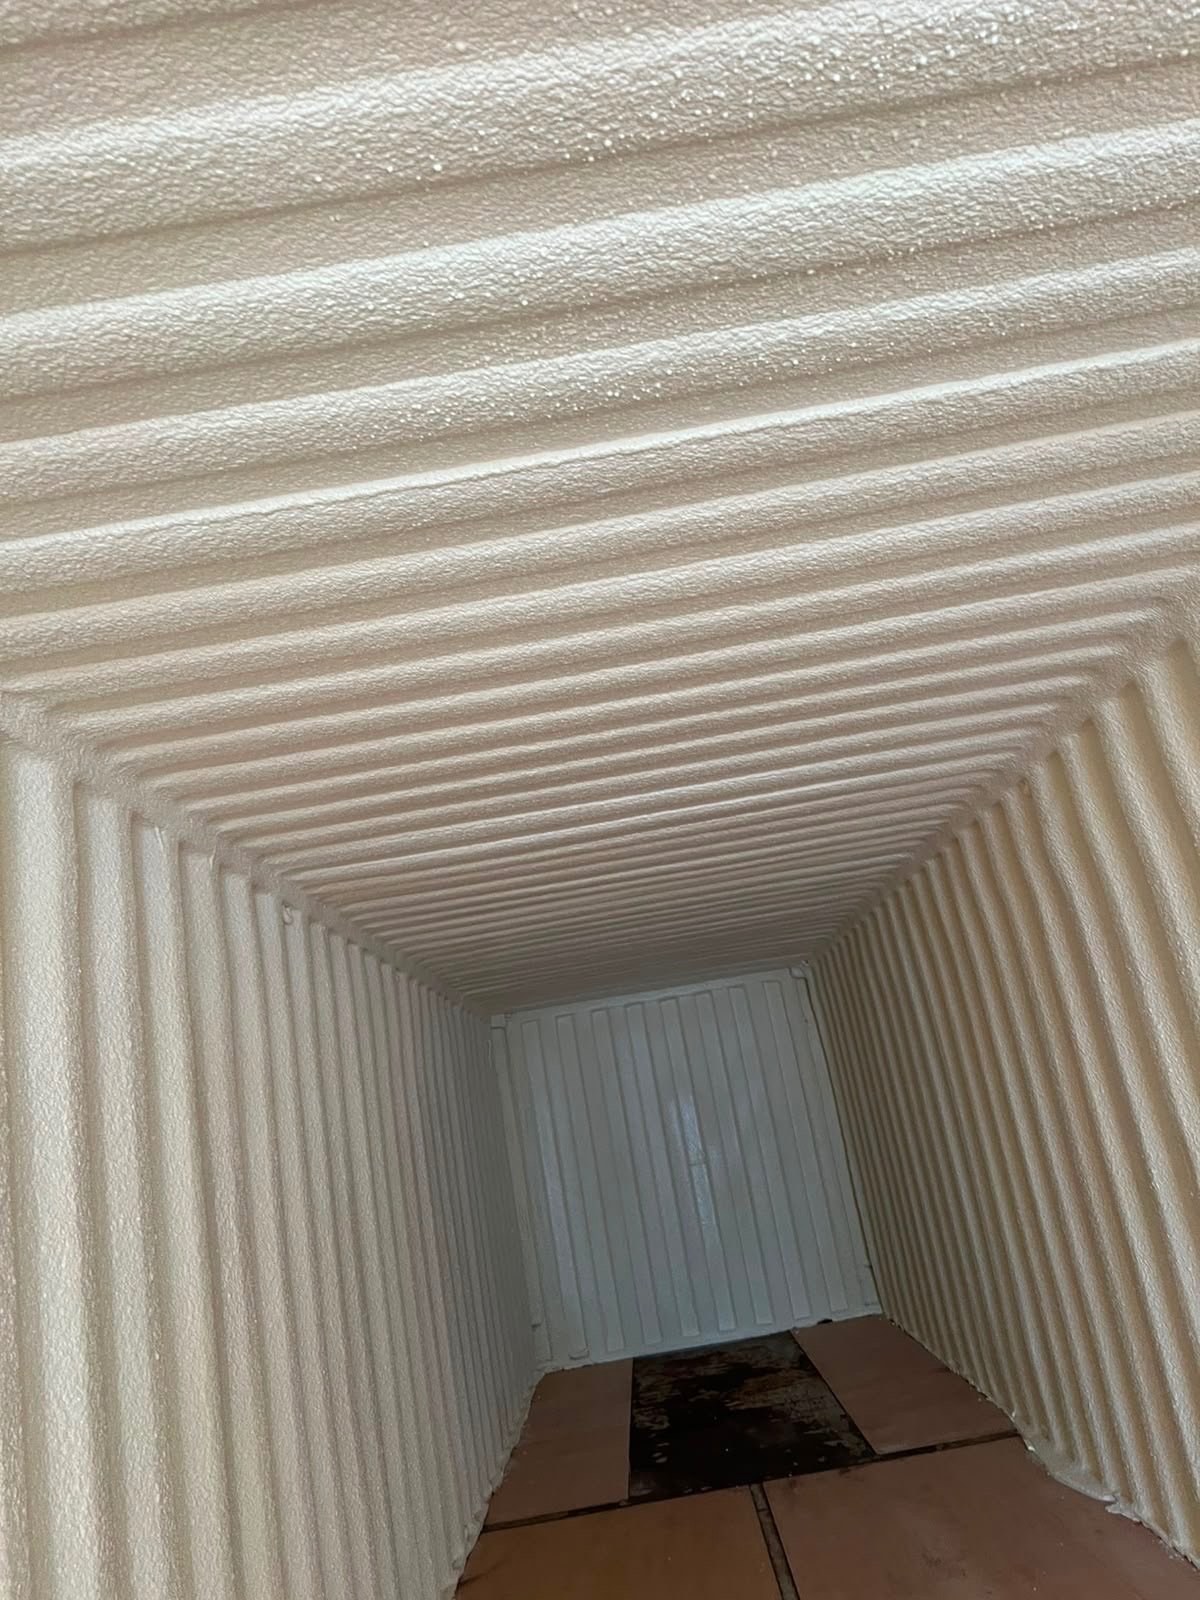
The Regis School’s steel storage containers had a condensation problem. We emptied and protected one container, then fully encapsulated the inside with 25 mm closed-cell foam in a single visit. The treatment addressed that container’s confirmed problem.
Condensation reported stopped.
The second container had a live leak, so we did not spray it.
Your container's depth and programme are set at survey. Read The Regis School container project.
Backed by our 25 year HOLVEM workmanship warranty, plus the manufacturer's 25 year product warranty issued directly to you.

